Categorize your Transactions
Transaction categorization is how Integral knows what each transaction means — not just that value moved, but whether it was a trade, a fee, income, or a transfer between your own accounts. Assigning the correct type and GL accounts to each transaction is what allows Integral to generate accurate journal entries and produce audit-ready books.
Uncategorized transactions will not produce journal entries. Mis-categorized transactions will produce journal entries with incorrect GL postings. Keeping your categorization current is the most direct lever you have over the accuracy of your financials.
How Transactions Appear
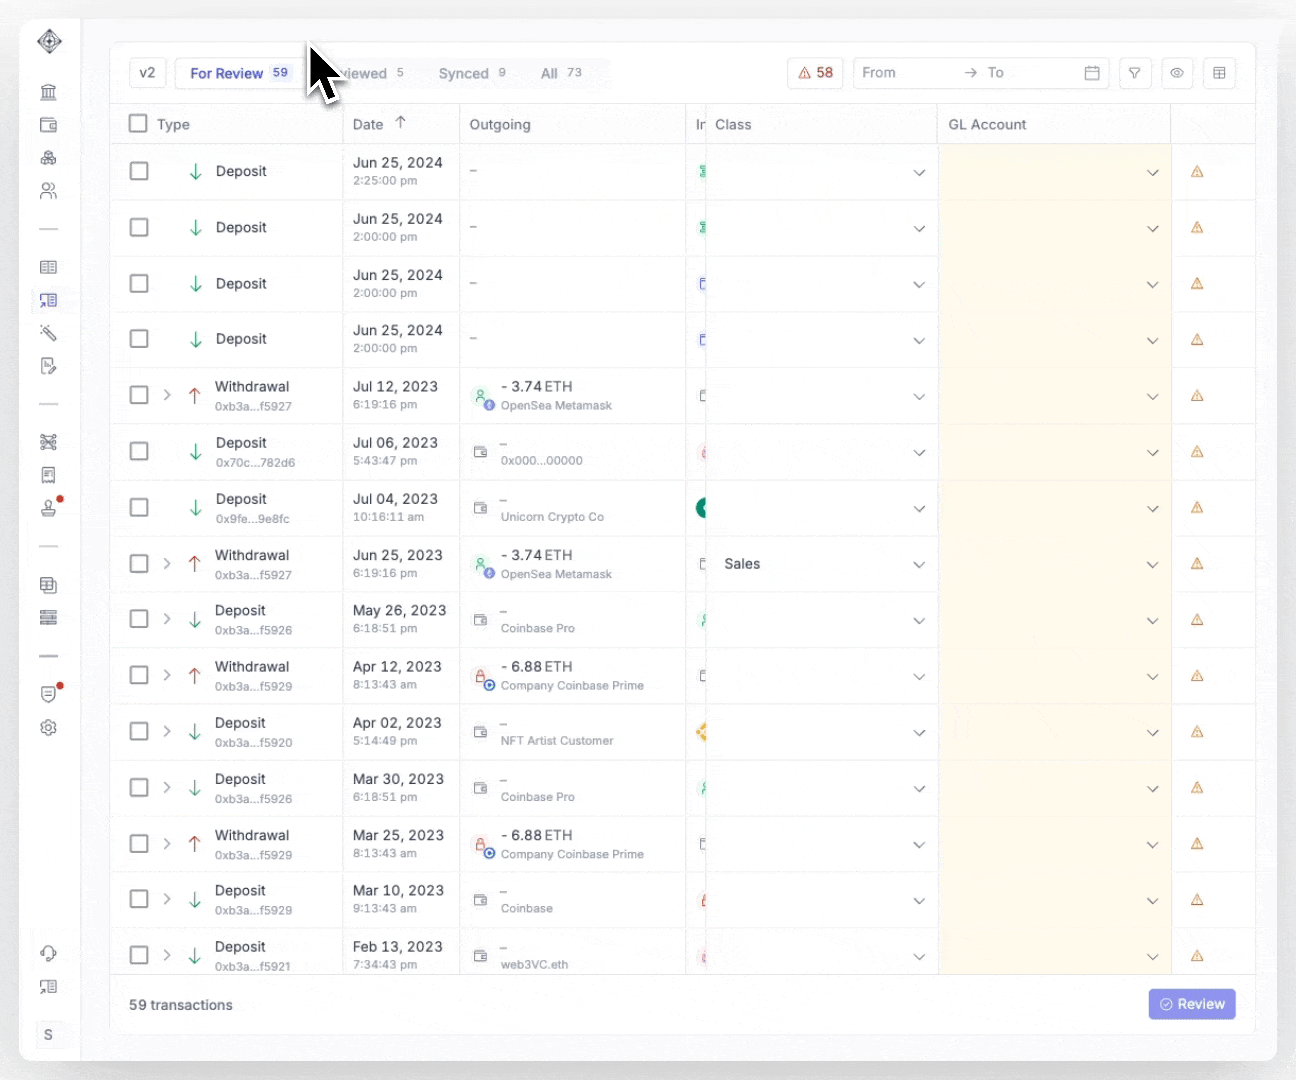
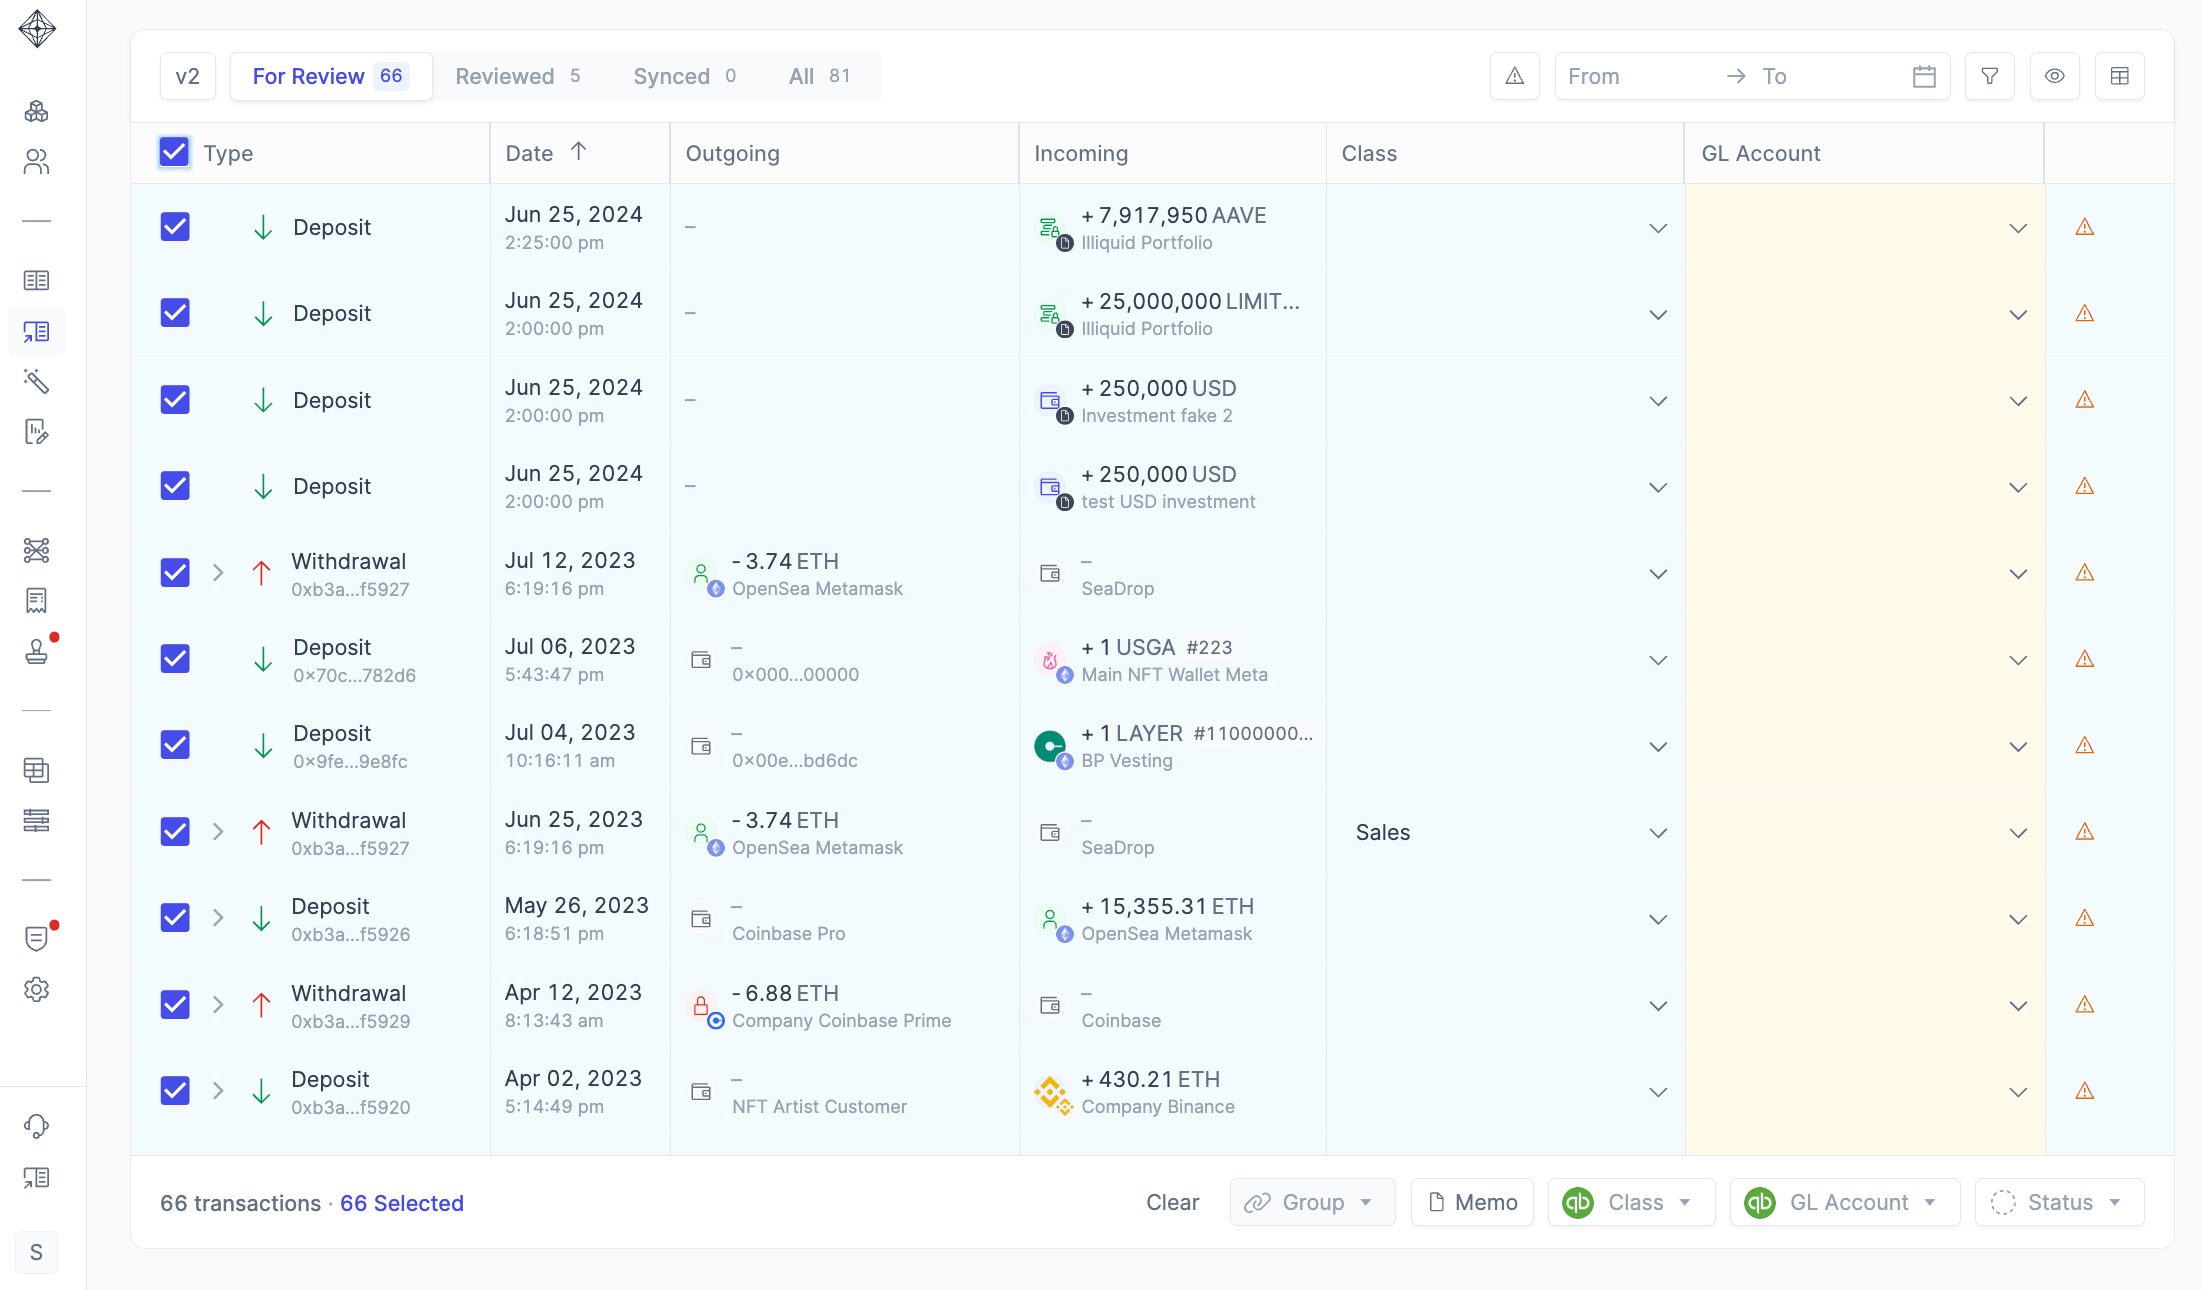
All incoming transactions — from connected exchanges, wallets, custodians, and bank accounts — land in Transactions in the left navigation. Transactions that have not yet been assigned a type are surfaced in the Needs Review queue at the top of the page.
Each transaction row displays:
Date — timestamp of the on-chain event or exchange settlement
Asset — token or currency involved (e.g., ETH, USDC, BTC)
Amount — quantity and, where a price feed is available, the USD equivalent at the time of the transaction
Direction — inbound or outbound relative to the connected account
Source — the exchange or wallet the transaction came from
Counterparty — the external address or account involved (if applicable)
Type — the currently assigned category, or blank if uncategorized
Status — whether the transaction has been reviewed
Click any transaction row to open the detail panel.
Transaction Types
Integral supports the following transaction types. Selecting the correct type determines which journal entry template is applied and which GL accounts are available to map.
Trade
A swap between two assets — for example, selling ETH to receive USDC. Integral treats a trade as a disposal of the outbound asset and an acquisition of the inbound asset, triggering cost basis and gain/loss calculations.
Transfer
A movement of assets between two accounts that you own and have connected to Integral — for example, moving ETH from a Coinbase account to a self-custody wallet. Because no economic event has occurred, transfers do not generate a gain/loss entry. Integral will attempt to auto-match the outbound leg from one account with the inbound leg on the other.
Internal Transfer
[Verify: Confirm whether "Internal Transfer" is a distinct type from "Transfer" in the UI, or if these are the same. If distinct, clarify when each applies — e.g., Internal Transfer may refer to movements within the same exchange between sub-accounts.]
Fee
A transaction representing a cost paid for executing a trade, on-chain gas, or a platform service fee. Fees are expensed to the GL account you designate (typically a trading fees or transaction costs account).
Income
Value received that represents earnings rather than a capital event — staking rewards, lending interest, yield distributions, or airdrops treated as ordinary income. Income transactions credit the appropriate income GL account and debit the asset account at the fair market value on the date received.
Expense
An outbound payment for a business cost — software subscriptions, services, or other operating expenditures paid in crypto or fiat. Expenses are posted to the GL expense account you assign.
Deposit
An inbound transfer from an external party into one of your connected accounts. Use Deposit when you are receiving funds from a counterparty that is not your own wallet — for example, a capital contribution or a client payment. [Verify: Confirm whether Deposit is distinct from a general inbound transfer in the UI.]
Withdrawal
An outbound transfer to an external party from one of your connected accounts — for example, paying a vendor or distributing funds to an investor. [Verify: Confirm whether Withdrawal is a distinct type or grouped with Expense/Transfer depending on context.]
Ignore
Marks a transaction as non-reportable. Ignored transactions are excluded from journal entry generation, gain/loss calculations, and all reports. Use this for known duplicates, test transactions, or on-chain activity that has no accounting significance. Ignored transactions remain visible in the transaction list and can be un-ignored at any time.
Manual Categorization
To categorize a single transaction:
Navigate to Transactions in the left sidebar.
Click the transaction row you want to categorize to open the detail panel.
Under Transaction Type, select the appropriate type from the dropdown.
Depending on the type selected, fields for GL Account mappings will appear. Assign the correct debit and credit accounts from your Chart of Accounts for each leg of the transaction. [Verify: Confirm the exact field labels — e.g., "Credit Account," "Debit Account," or "From Account" / "To Account."]
Optionally, enter a Memo to add a note that will carry through to the journal entry.
Click Save (or Confirm) [Verify: exact button label] to apply the categorization.
The transaction will move out of the Needs Review queue and a journal entry will be queued for generation.
Bulk Categorization
To apply the same type and GL accounts to multiple transactions at once:
Navigate to Transactions.
Use the filters (asset, date range, direction, source, status) to narrow the list to the transactions you want to categorize.
Check the checkbox on each transaction row you want to include, or use the Select All checkbox at the top of the list to select all transactions matching your current filter. [Verify: exact label for select-all control]
With multiple transactions selected, click Categorize [Verify: exact button label — may appear as "Bulk Edit" or similar] in the action bar that appears.
In the bulk categorization panel, select the Transaction Type and assign the GL Accounts to apply across all selected transactions.
Click Apply to save. [Verify: exact button label]
Bulk categorization overwrites the existing categorization on any selected transaction that was previously categorized. Review your selection carefully before applying.
Review Queue
The Needs Review queue [Verify: exact label] surfaces all transactions that require attention before journal entries can be generated. A transaction appears in this queue when:
It has not been assigned a transaction type
It has been flagged due to a missing GL account mapping
It was auto-categorized by a rule but has an incomplete Chart of Accounts mapping [Verify]
A potential duplicate has been detected [Verify]
To work through the queue:
Go to Transactions and select the Needs Review tab [Verify: exact tab label].
Open each transaction, apply the appropriate type and GL accounts, and save.
Once saved, the transaction is removed from the queue.
You can also use bulk categorization to clear multiple transactions from the queue at once if they share the same type and GL mapping.
The main task to do in Reviewed is to click on Sync Txn in the bottom right corner to generate your Journal Entries and sync your transactions to your connected ERP.
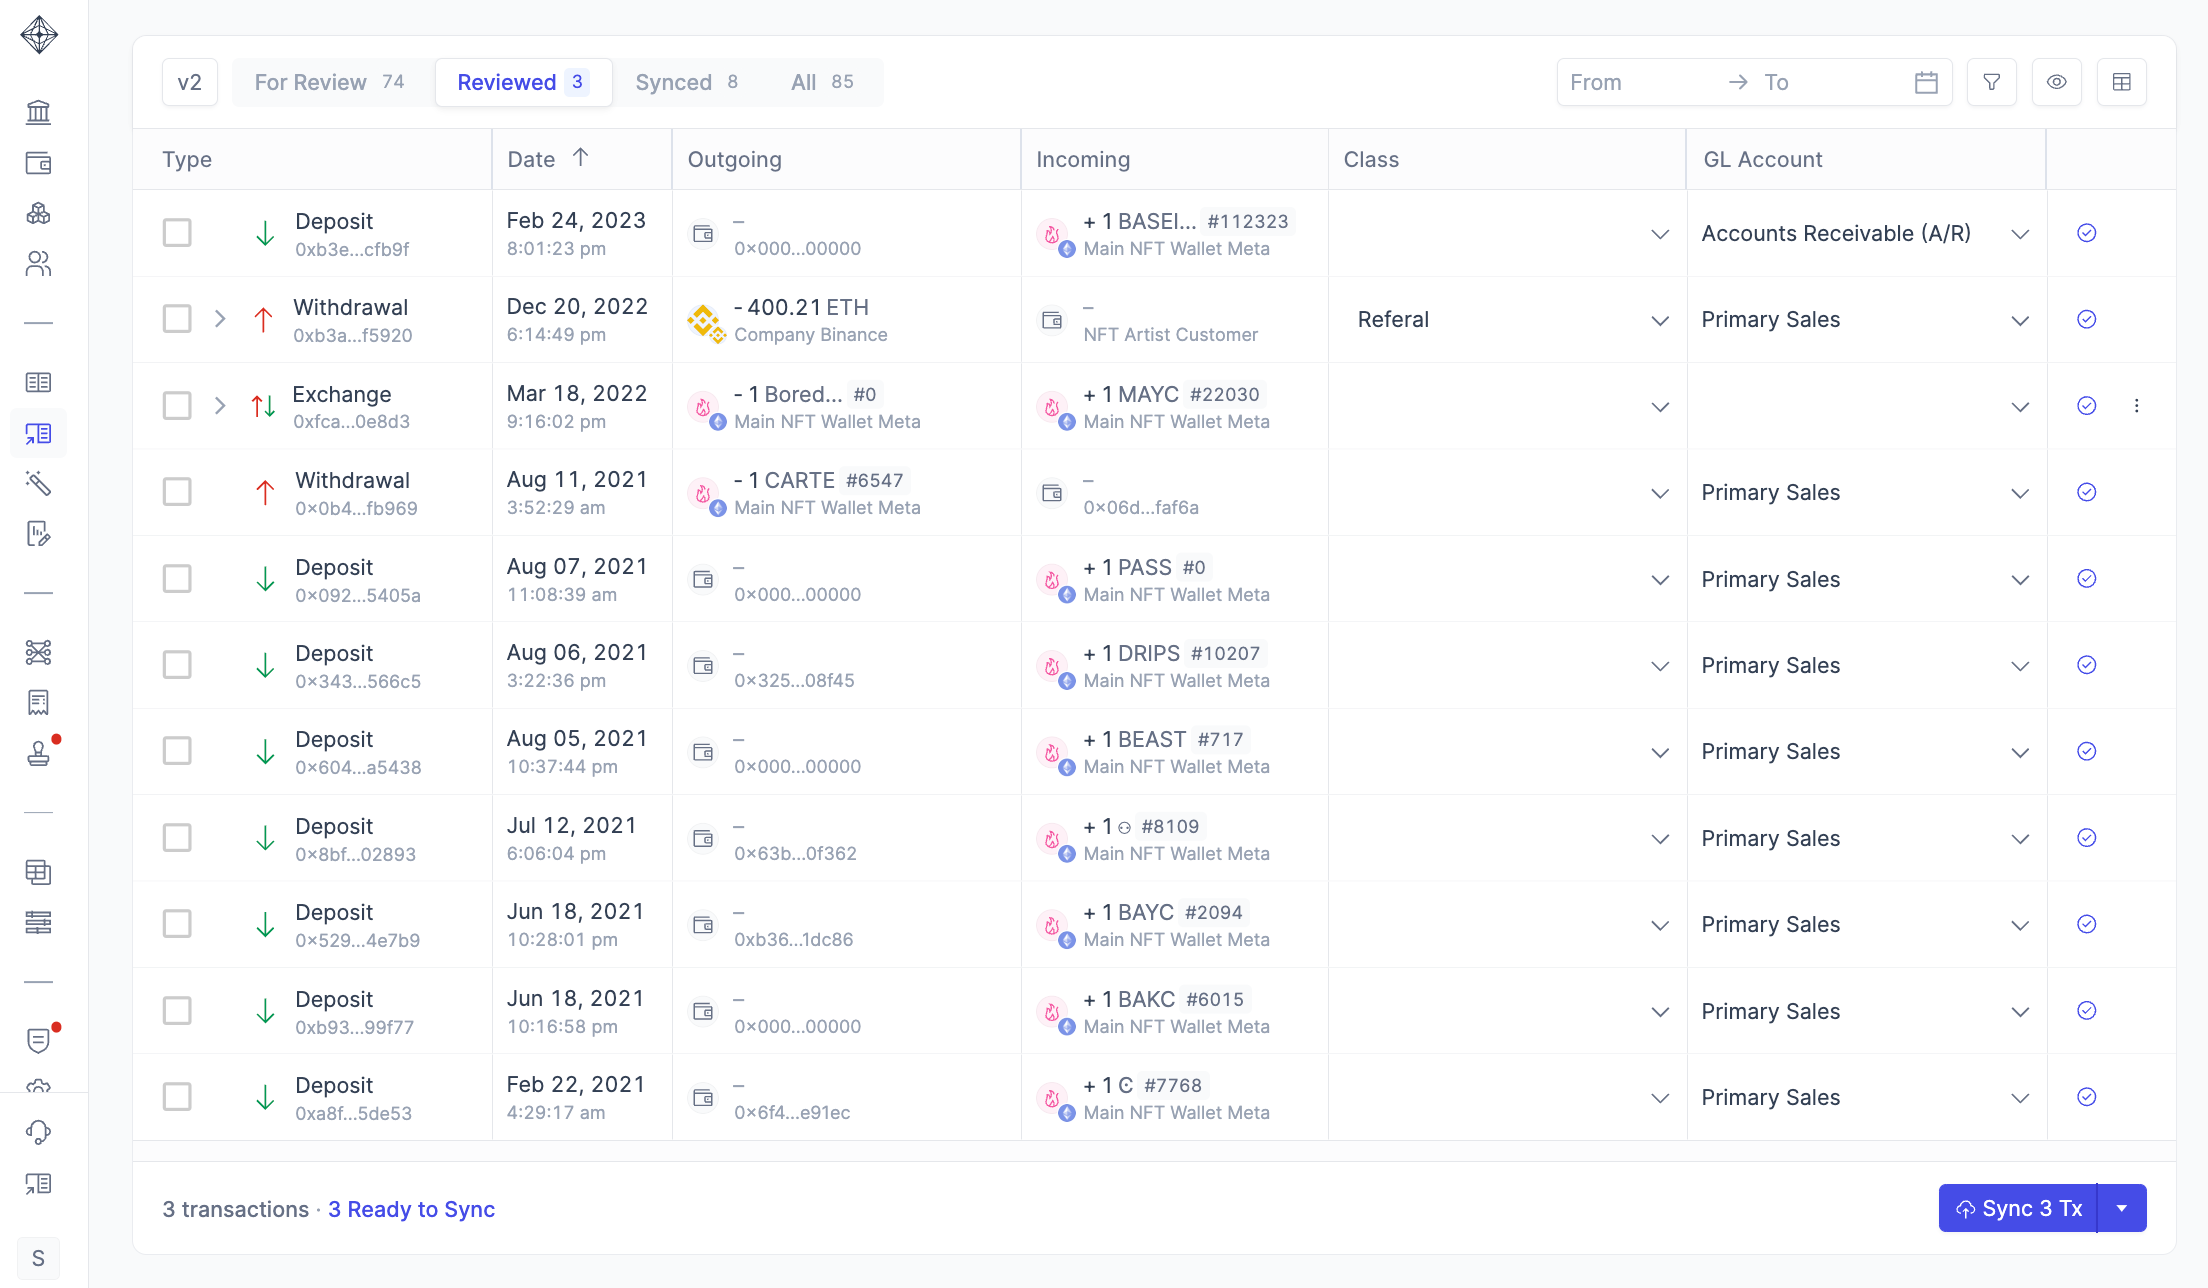
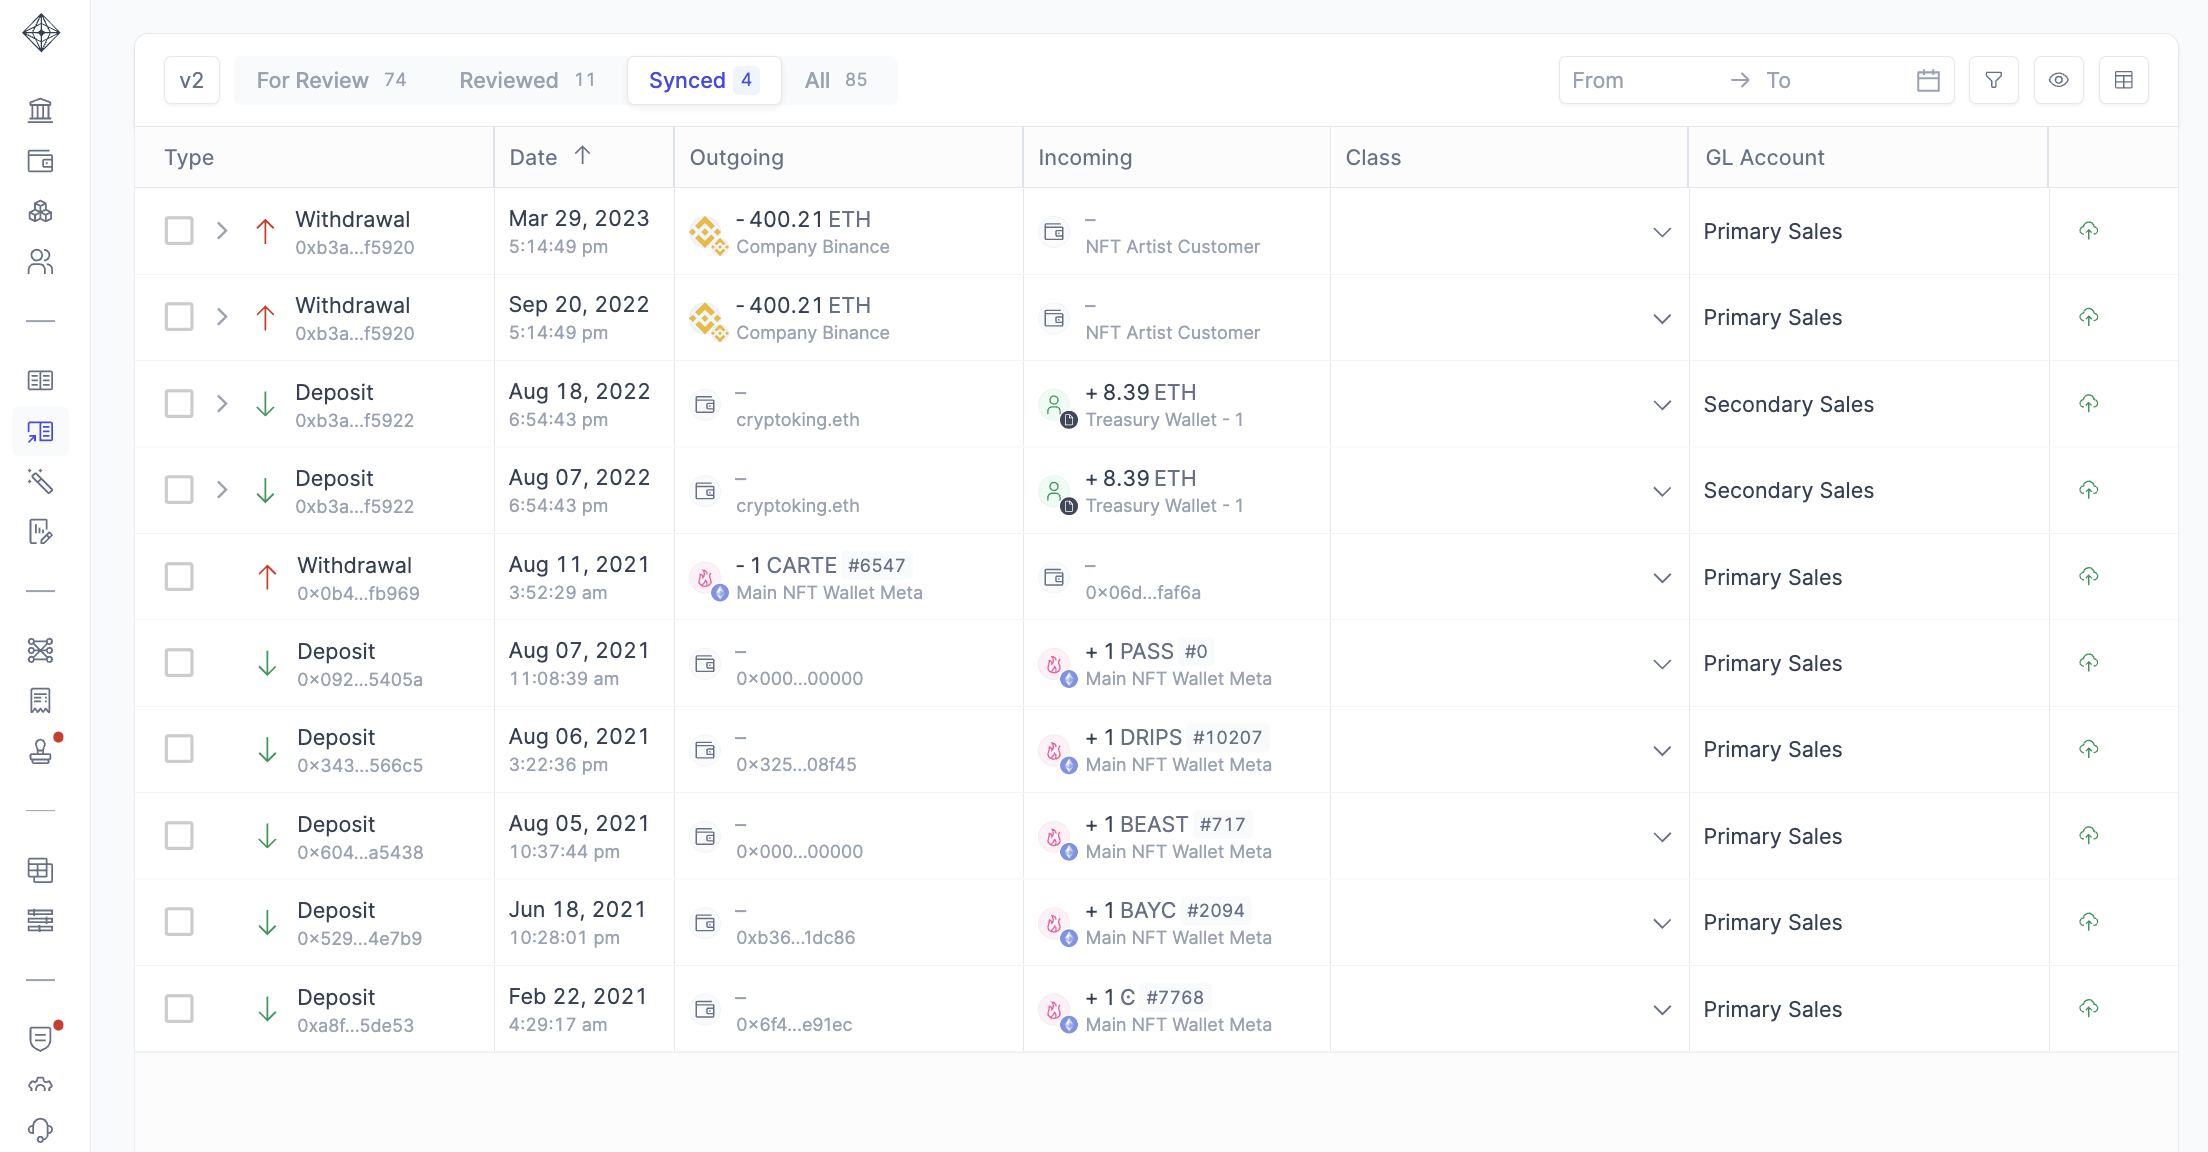
Synced
Once your transactions are synced, they will appear in the Synced tab. There's no action required here, except to review past transactions for any issues.
In rare cases, you might need to re-sync transactions due to a validation error. You can move a transaction back to For Review, but ensure you amend the Journal Entry in your ERP to avoid duplicating line items.
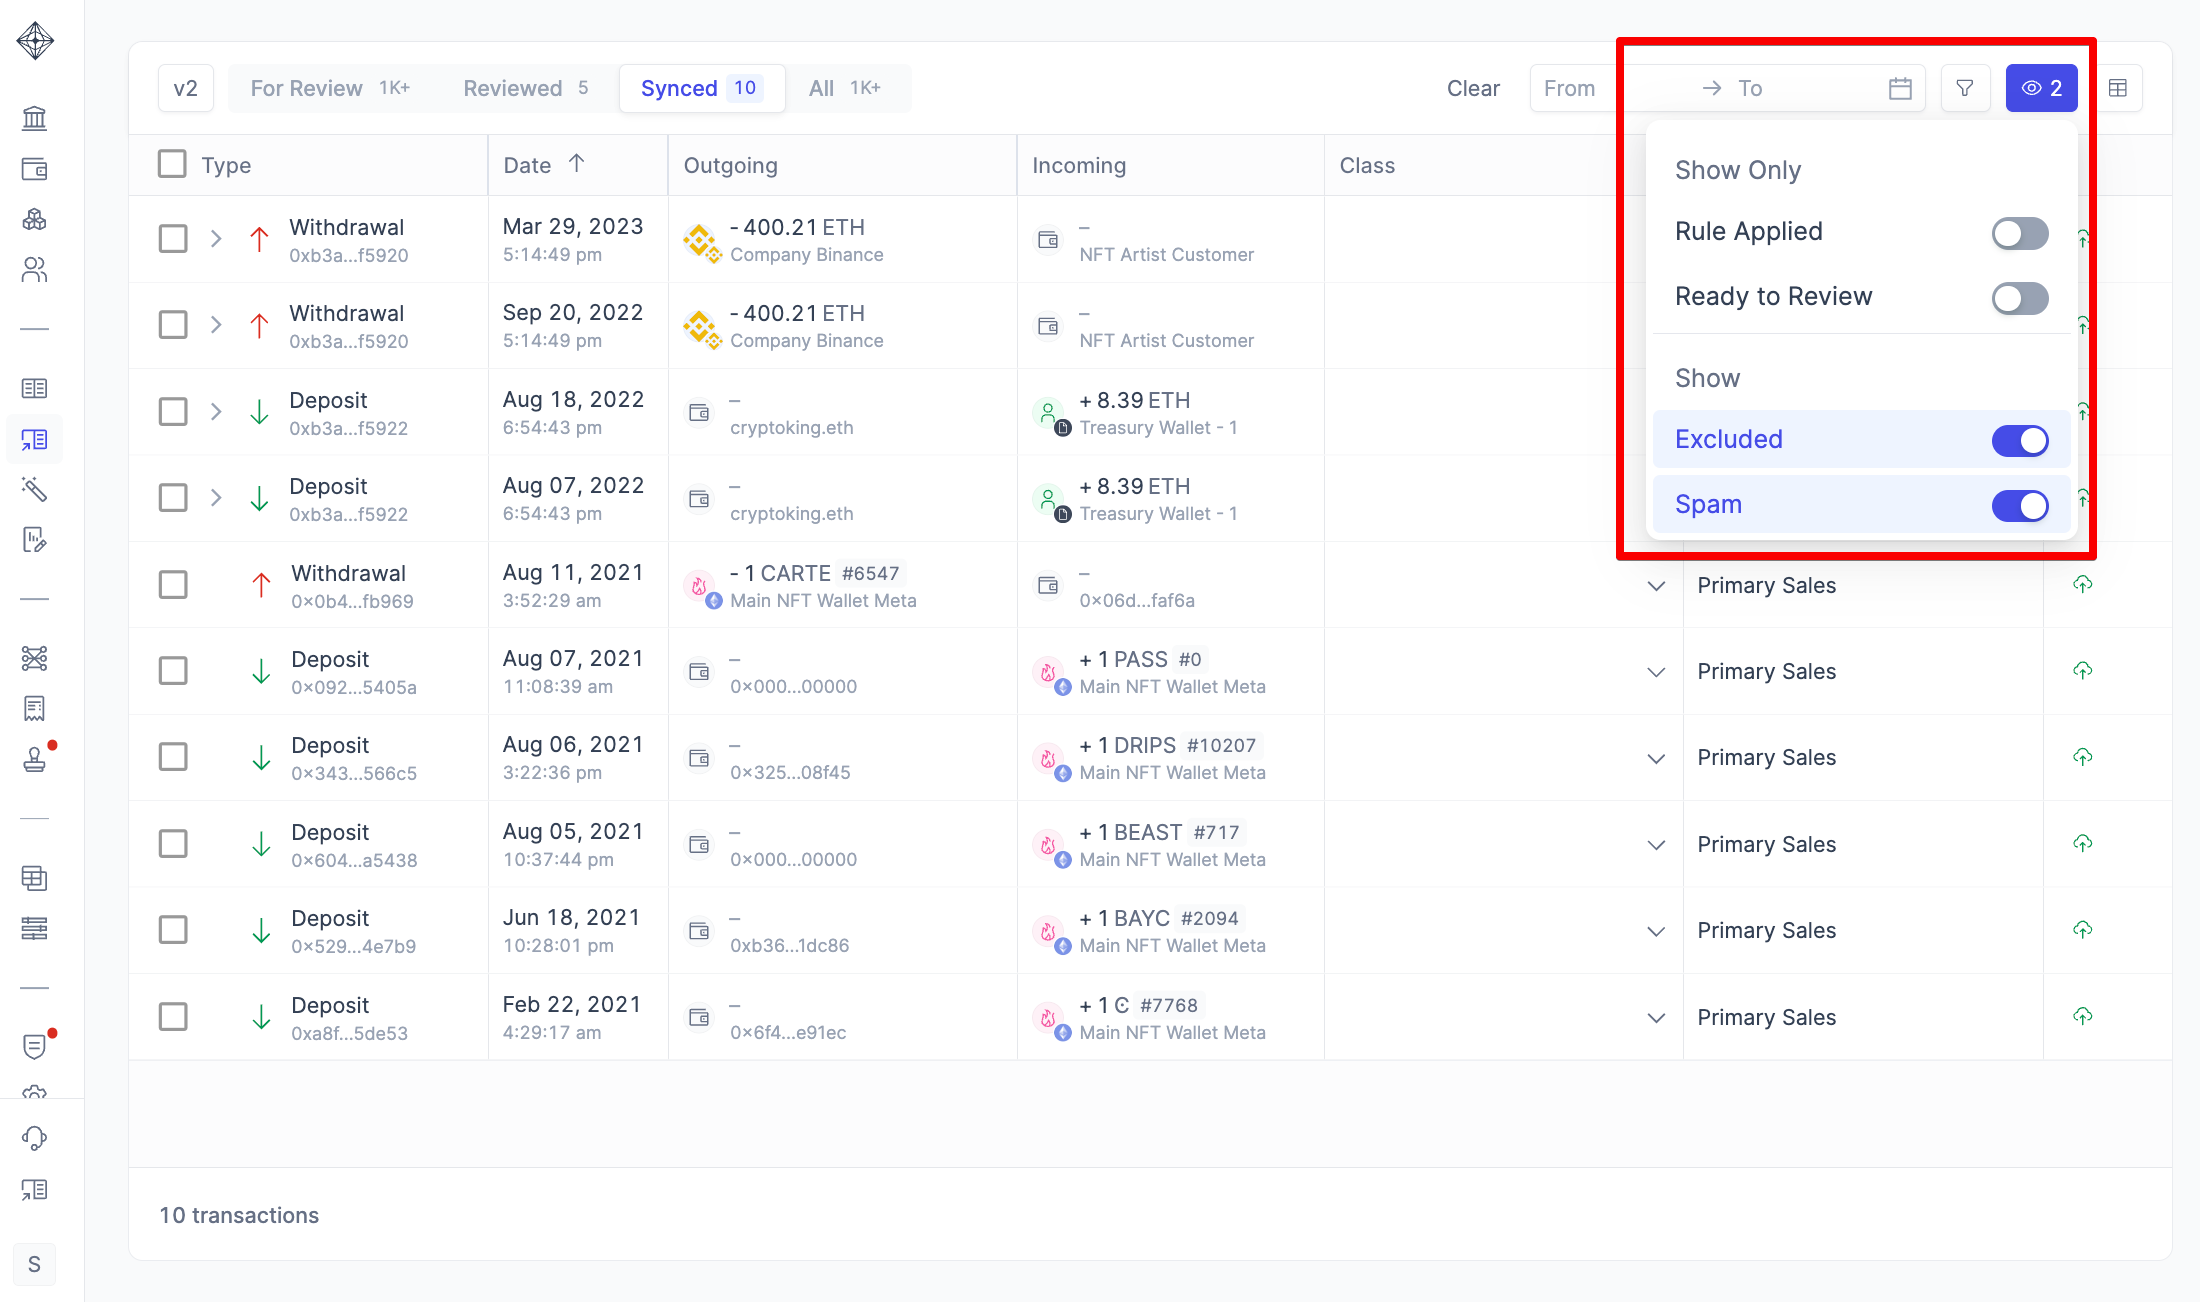
How to view excluded and spam
Integral has robust spam filtering built-in, but there may be cases where you want to review those transactions anyways. To view Spam and Excluded transactions, click on the View icon in the top right-hand filtering section, and toggle Excluded and/or Spam.
To view all your spam tokens and mark/unmark them as Spam , head to Policies -> Spam.
Bulk Actions
When you select multiple transactions in Bookkeeping V2, several Bulk Actions become available. Simply select more than one transaction, and a menu bar will appear at the bottom of your screen:
Memo: Add a short description to a bulk group of transactions
Class: Add a bulk group of transactions to a Class imported from your ERP
Status: Move a bulk group of transactions (up to 100) to a different Bookkeeping page (most commonly used to exclude transactions).
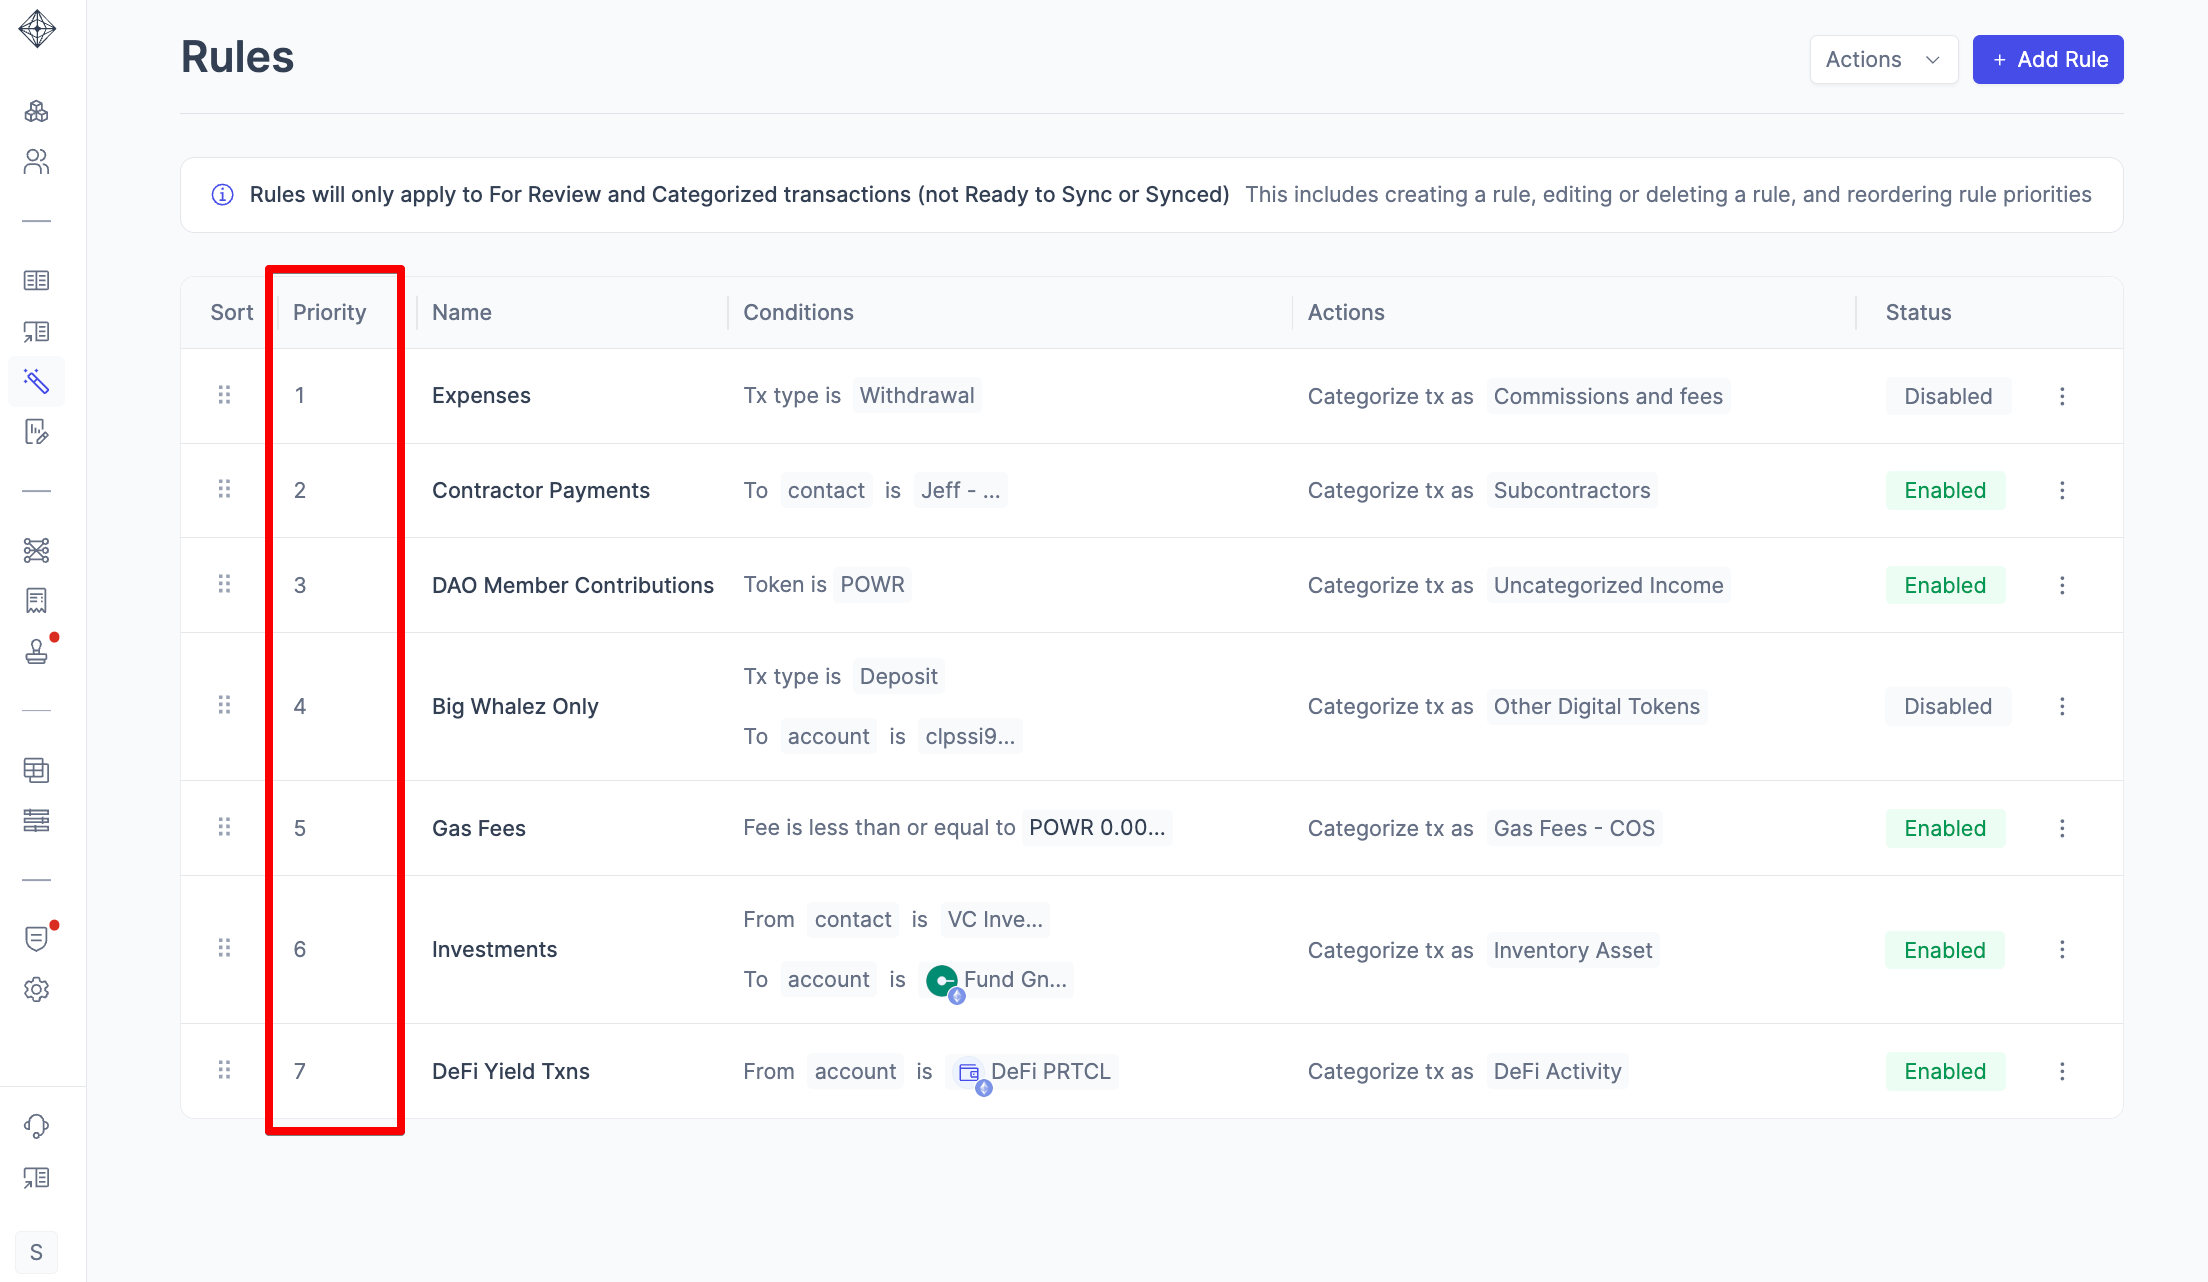
Rules Engine
The rules engine lets you define conditions that automatically categorize transactions as they are ingested — or retroactively apply categorization to existing transactions that match.
Creating a Rule
Navigate to Settings → Rules .
Click New Rule (or + Add Rule).
Enter a Rule Name to identify it.
Under Conditions, define one or more criteria. Available condition types include:
Counterparty Address — matches transactions involving a specific wallet address or labeled counterparty
Asset — matches a specific token or currency (e.g., all USDC transactions)
Direction — inbound or outbound
Amount Range — transactions above, below, or between specified values
Source / Exchange — transactions originating from a specific connected account
If adding multiple conditions, specify whether transactions must match All conditions (AND logic) or Any condition (OR logic).
Under Actions, select the Transaction Type to assign and map the appropriate GL Accounts.
Click Save Rule.
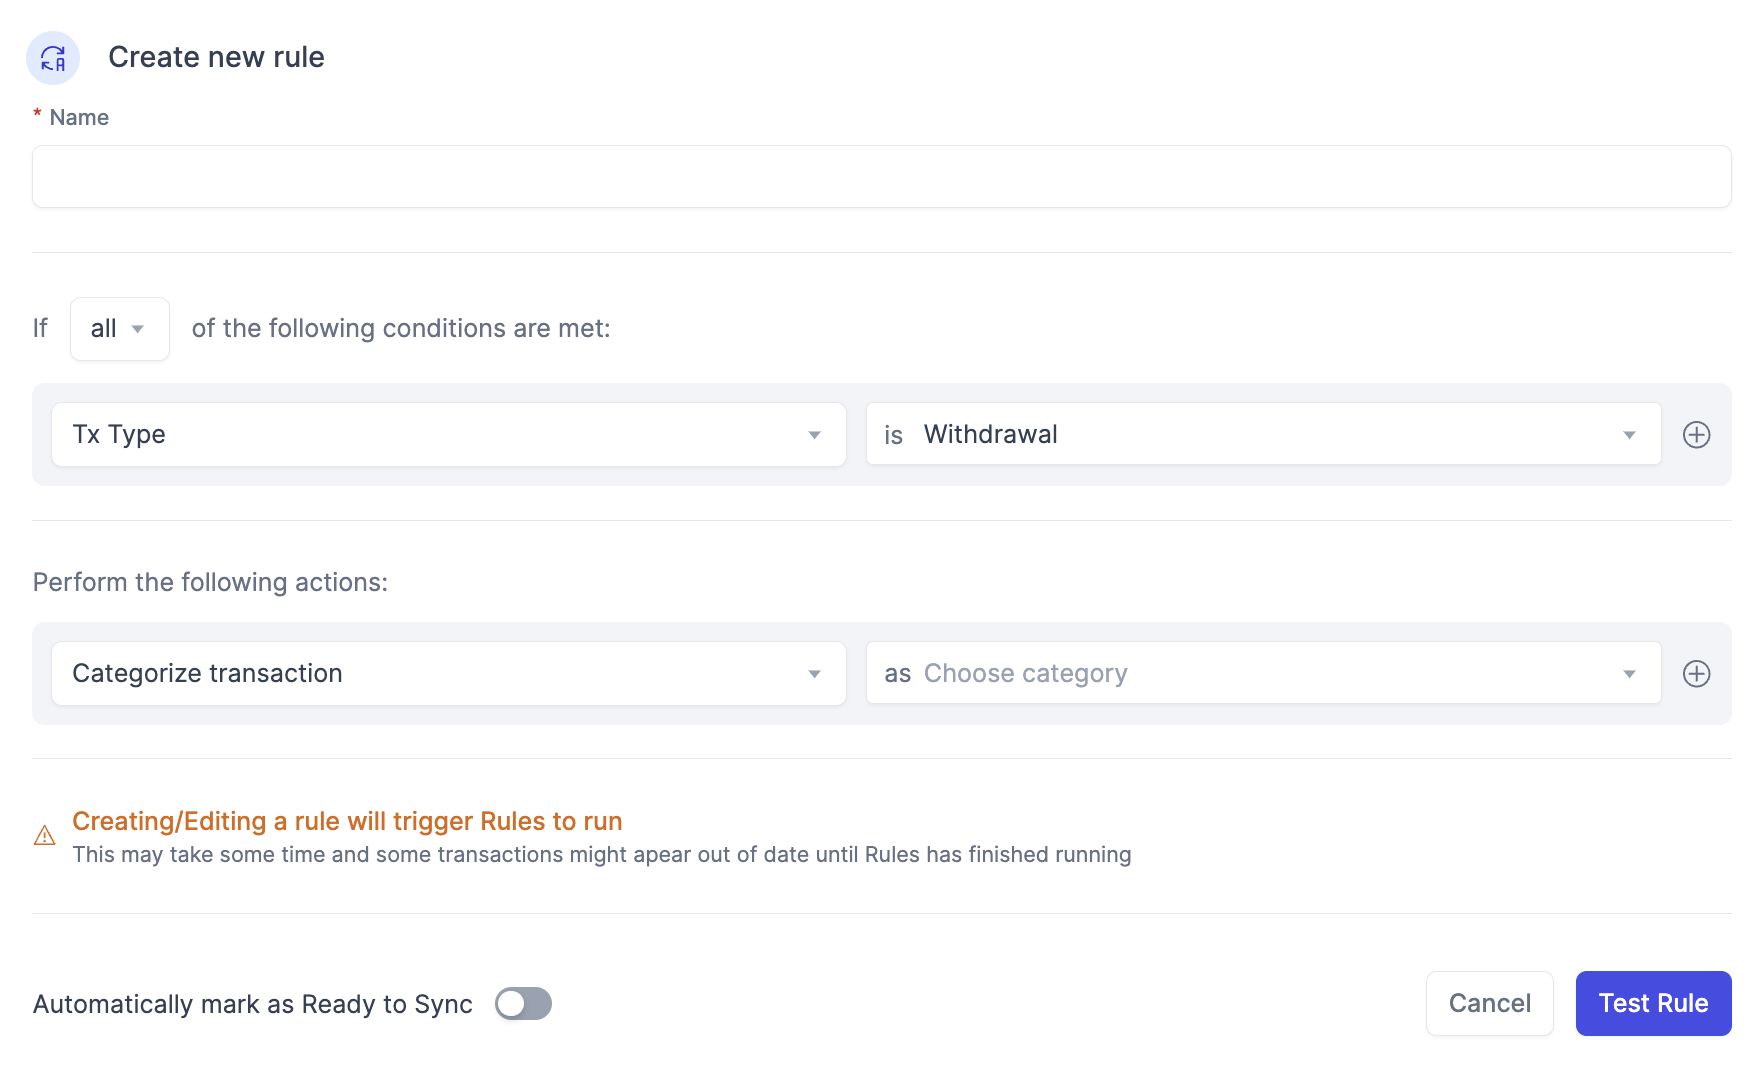
Applying Rules
After saving, you will be prompted to choose whether to apply the rule to existing transactions that already match the conditions, in addition to future transactions. Select Apply to existing if you want the rule to retroactively categorize your history.
Rules are evaluated in priority order. If multiple rules match the same transaction, the highest-priority rule wins. You can reorder rules by dragging them in the rules list.
To learn how to make a rule, please visit here.
Counterparty Labels
Assigning a label to a counterparty address — for example, tagging 0xabc...123 as "Binance Hot Wallet" — serves two purposes.
First, it makes the transaction list easier to read: the label appears in place of the raw address throughout Integral's UI and exports.
Second, counterparty labels can be used as rule conditions. Once an address is labeled, you can create a rule that says "any inbound transaction from Binance Hot Wallet → categorize as Deposit to exchange account X." This is especially useful for recurring flows involving known counterparties like exchange hot wallets, custodians, or protocol contracts.
To label a counterparty:
Open any transaction involving the address.
Click the counterparty address in the detail panel.
Enter a Label name and click Save.
The label will apply to that address across all transactions where it appears.
Impact on Journal Entries
Every categorized transaction in Integral maps directly to a journal entry. The transaction type you select determines the journal entry template — which accounts are debited and credited, and whether a gain/loss calculation is triggered.
For example:
A Trade generates entries for the disposal of the outbound asset (with realized gain/loss posted to your gain/loss account) and the acquisition of the inbound asset at fair market value.
An Income transaction credits the income account you specify and debits the relevant asset account.
A Transfer between your own wallets generates no P&L entry — only a movement between asset sub-accounts.
Incorrect categorization produces incorrect journal entries. A transfer mis-categorized as income will overstate revenue. A trade mis-categorized as a transfer will omit the gain/loss entry entirely. These errors compound over time and will require manual journal entry corrections before your books are audit-ready.
Journal entries are generated after categorization. If you recategorize a transaction after its journal entry has been posted, Integral will reverse the original entry and post a corrected one.
Troubleshooting
Transaction is showing the wrong type after auto-categorization
A rule may have matched incorrectly. Open the transaction and check the detail panel to see which rule applied. Manually override the type by selecting the correct one and saving. Then review the rule that applied and tighten its conditions to prevent future mis-categorization.
A rule I created is not applying to new transactions
Check the following:
Confirm the rule is active (not disabled) in Settings → Rules.
Verify the conditions match exactly — address labels are case-sensitive, and amount ranges must bracket the transaction value correctly.
If multiple rules exist, check the priority order. A higher-priority rule may be matching first and overriding yours.
New transactions must be ingested after the rule was saved for it to apply automatically. If the transaction came in before the rule existed, re-run the rule retroactively from the rules management page.
Duplicate transactions are appearing
Duplicates most commonly occur when the same transaction is ingested from two sources — for example, a transfer that appears in both the sending wallet and the receiving wallet when both are connected to Integral. Integral attempts to auto-match and deduplicate these, but unmatched legs may appear separately.
To resolve:
Open both transactions and confirm they represent the same on-chain event (matching hash, amount, and timestamp).
Categorize one as Transfer and use the Link Transaction feature to associate the two legs.
If a true duplicate exists with no corresponding match, categorize one leg as Ignore.
Why can't I categorize transactions in bulk?
To categorize more than 100 transactions at once, you will have to create a rule with the required conditions. All historical transactions that fall under that rules conditions will be categorized!
Why is the price of my transaction in yellow?
Integral does not allow transactions without a token price to be synced to your ERP. If a transaction involves a token that Integral does not automatically recognize, the token will remain unpriced. To update the price:
Click into the transaction details and manually enter the token price.
Alternatively, contact Integral support at help@integral.xyz to request a specific token. tobe priced in your account.
This ensures all synced transactions in your ERP are properly priced and accounted for.
Reach out to your Integral onboarding contact or email help@integral.xyz
Last updated: April 2026